Why I Built an ErgoDox Kit
June 01, 2014I like the concept of building my tools. I respect things I build more than easy purchases. There is a certain sense of pride in completing a project. It serves as a catalyst for making more stuff. This is the most complex project I've taken on to date, and I'm enjoying the success.
It was a challenge
There was a lot of labor involved.
There were 76 key/diode pairs in this kit requiring 308 solder joints . The Teensy 2 and MCP23018 had 24 and 28 joints each. There were 5 resistors and 3 LEDs for 16 more joints. The USB cable and jack resulted in another 10 points, and the TRRS jacks added 8. This is a total of 390 drops of solder. It is the most complicated thing I've built to date.
The whole job took me about 4.5-5 hours. Soldering diodes was a time-sink at first, but I learned some assembly tricks that make it easier.
Soldering
The soldering part was the second-biggest challenge in this build. I've never done surface work before, and I now feel confident enough to take on more complex circuits.
A good soldering station is worth it for rapid heating and complete control over temperature. I was able to turn down temperatures for the diode, and up for the heavier-duty joints to keep the metal flowing.
Applying diodes
I thought like an assembly line worker and came up with a pattern for diode assembly. I unpacked the diodes into a rounded cup for easy picking. I then soldered all the cathode pads at once. Rhythm is important if you want consistent solder joints.
I used a pair of small sharp tweezers to handle the diodes. I had a strong light at hand to see the light white cathode mark, and heated and set the cathodes in one go. Once the diodes were in place, I did a third pass soldering down the anodes. This part was difficult because it's a tight fit. A thinner tip may help here.
That darn USB cable
The most frustrating part of the build was the USB cable. You need to cut, strip and throw away a bunch of plastic bits to get a USB connector for the Teensy 2.
A label scraper (razor blade holder) makes quick work of the USB cable housing. I used it to divide the housing into chunks at angles so I could peel them off.
Automatic wire strippers are worth it. They are a set of pliers that can strip any gauge of wire like magic.
Even though the instructions don't say to, putting some tin on the wires helps them thread through the board.
Applying keys
Again, think of how you'd build the project if you had to run a hundred of them.
Check and straighten every switch lead before insertion. I ended up smashing 2-3 of them before I got wise to their bent nature. You can put your finger on the back of the board while inserting them, and they'll make a click instead of a thump on insertion.
Solder two switches in opposite corners with the switches 'floating' in the air to keep them from wedging sideways. Then you can insert the rest of the switches as a step and solder them as a second step. It's much more convenient than alternating between place and solder.
Check your switches for crooked inserts before and after soldering. Just heat and twist them to align. I did about 5 switches a bit crooked but thought to do straighten them before assembling the board.
The result is perfect
Several features that make this the ideal keyboard to me: configuration, comfort, convenience.
I can configure it
Right now I'm running the 'kinesis-mod' firmware. I'm looking into alternate firmware to make a full range of layer functionality and chording possible. This is the exploration part of the build. I'll be at this for a while.
I'm also looking into alternate typing layouts like Workman or Colemak. I've used Dvorak in the past, but jumping OSes made it difficult to swap layouts. I used Colemak for a bit a few months back and it felt pretty natural; Workman seems like an extension of this.
It's comfortable
The metal top I got is not just about aesthetics. I game with a SteelSeries mouse pad that's made of metal, so the feel is consistent between my mouse pad and keyboard.
Metal is tough, and ages with grace. It's also easy to wipe clean and oil from my hands won't look so bad on it.
It types well
I'm a fan of matrix layouts because they throw away the concept of typewriter bars (it's 2014 hello) in favor of human ergonomics. The TECK (my previous ergo) and the Kinesis Ergo QD are past devices I've used with this layout.
The left-hand side works like a n52 speed pad making the left hand plus my mouse a great set up for FPS games. I can move my hand to the right to type when I need to.
No end in sight
I'll be learning a lot about this board and what works and won't in the next few weeks. I'll commit my configuration files to share my layout in the future. For now, I'm going to keep close track of what works and what doesn't and try to keep a note somewhere to jot down notes for a future post.
In summary: happy. Typing this write-up has made me confident that I've made the right choice. I'm now typing at my usual speed after a short break-in and that makes me feel like it's the right choice.
The finished work
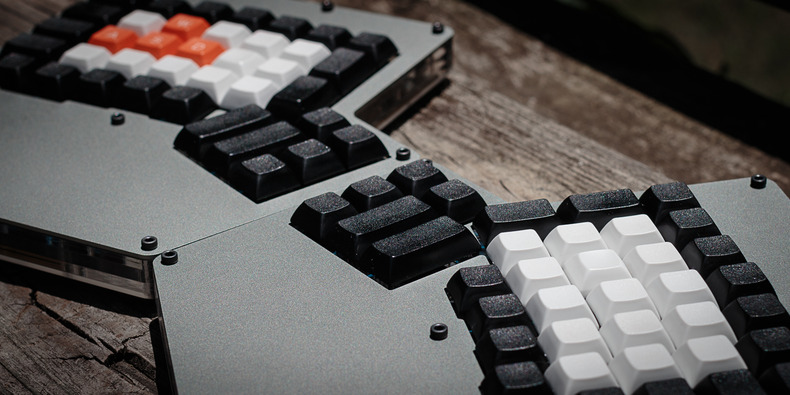
It has Signature Plastic white PBT and double-shot WASD cluster from the Dolch set.
